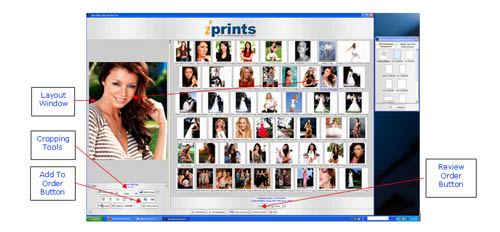
4. Select a thumbnail image by clicking on it. Then, drag-and-drop the thumbnail image from the right into the Layout window on the left.
5. Your picture will appear in the left Layout window. Use the intuitive cropping tools beneath the Layout Window to rotate the image or layout, zoom in on the picture and adjust your image within the box for the cropping you want.
6. Click on the Add to Order  icon on the bottom right of the of the print window when you are satisfied with your cropping. Now, repeat the drag-and-drop action for the next thumbnail and continue doing so until your order is complete. You can change print sizes simply by clicking on another print size template in the Print Size Palette . icon on the bottom right of the of the print window when you are satisfied with your cropping. Now, repeat the drag-and-drop action for the next thumbnail and continue doing so until your order is complete. You can change print sizes simply by clicking on another print size template in the Print Size Palette .
< Previous Page |
 (under the thumbnails) at any time to see the print selections you have made for your order. Revisions or print quantity changes can be made in the Review Order screen or by going back
  to the main window. Finish and place your lab order by clicking on the Complete Order